Before you start
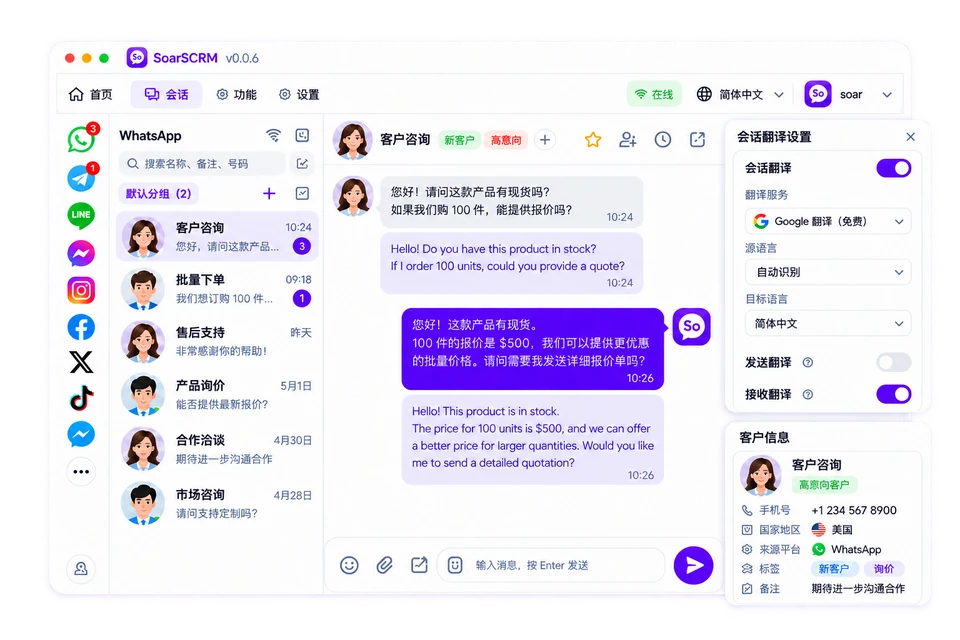
Sign in to SoarSCRM and your LINE account in the Windows app. Open a conversation that can send and receive text messages. The steps below use SoarSCRM’s conversation translation settings.
Check the direction of translation
| Setting | Incoming customer messages | Your outgoing replies |
|---|
| Source language | The customer’s language, or auto-detect when supported | The language you type |
|---|
| Target language | The language you want to read | The language your customer uses |
|---|
How do I automatically translate incoming LINE messages?
For a customer writing in another language, set the incoming target language to the language you want to read.
- Choose the correct account and conversation, then open its translation settings. Enable the conversation-specific configuration to change only this chat. When it is off, the controls follow account defaults and cannot be edited individually.
- Enable incoming translation and select an available translation service. Choose the customer’s source language, or auto-detect if supported, then select your reading language as the target.
- Click Apply at the bottom of the panel and wait for confirmation. Check the translation of a subsequent incoming text message in that conversation.
Check the resultIncoming translations should use your reading language. Configure the reply language separately under outgoing translation.
Keep in mind:Changing the translation service can reset language selections. Check both languages again. Whether all older messages are retranslated is not a reliable check of new-message translation.
Back to tutorial contents ↑How do I preview a translated reply before sending it on LINE?
Use your typing language as the source, the customer’s language as the target, and enable Preview Before Sending.
- In the customer’s conversation settings, enable conversation-specific configuration and outgoing translation. Select a service, your source language and the customer’s target language.
- Enable Preview Before Sending, click Apply and wait for confirmation. Incoming translation alone does not enable reply previews.
- Write a short reply you intend to send. Press Enter to review the translation preview. Check amounts, quantities, dates and names, then confirm sending only when the wording is correct.
Check the resultWith preview enabled, Enter should open the translation confirmation step before sending the reply.
Keep in mind:Turning off outgoing translation also turns off the preview. If you do not intend to send the reply, cancel the preview and edit it instead of repeatedly sending test messages to customers.
Back to tutorial contents ↑How do I use different languages for different LINE customers?
Conversation-specific configuration controls one chat. Chats without it follow the account’s default settings.
- Open the first customer’s conversation and enable its individual configuration. Set your reading language for incoming messages and the customer’s language for replies, then click Apply.
- Open the second customer’s conversation and check the account and contact. Enable its individual configuration, select that customer’s language and click Apply. Do not change account defaults just to configure one customer.
- Return to both chats and check their outgoing target languages. To make a chat follow account defaults again, disable its individual configuration and click Apply.
Check the resultTwo individually configured chats can use different reply languages. Chats with individual configuration off follow account defaults.
Keep in mind:Check private and group conversations separately. Verify the current contact and settings before sending quotations or important agreements.
Back to tutorial contents ↑What if LINE translation fails, controls are disabled or the language is wrong?
Check the conversation state, saved settings, language direction and service in order, changing one thing at a time.
- If the panel asks you to sign in or says the conversation is being prepared, complete platform sign-in and open a chat. Check that text messaging works before changing translation switches.
- If controls are disabled, check whether individual conversation configuration is off. Enable it when needed, verify incoming and outgoing switches, then click Apply and confirm that saving succeeds.
- If the translation uses the wrong language, check source and target languages separately for incoming messages and replies. Recheck them after changing translation services.
- If a saved configuration still fails, check the network, service availability, plan entitlements and translation allowance. Give support your platform, app version, steps and error text; hide account details and messages in screenshots.
Check the resultRecheck with one text message. If it still fails, keep the exact error and time for support.
Keep in mind:These steps cover text chat. Image, voice and file translation are separate capabilities and cannot be inferred from the text translation switches.
Back to tutorial contents ↑Still need help? Contact support →